Last Updated: May 6, 2026
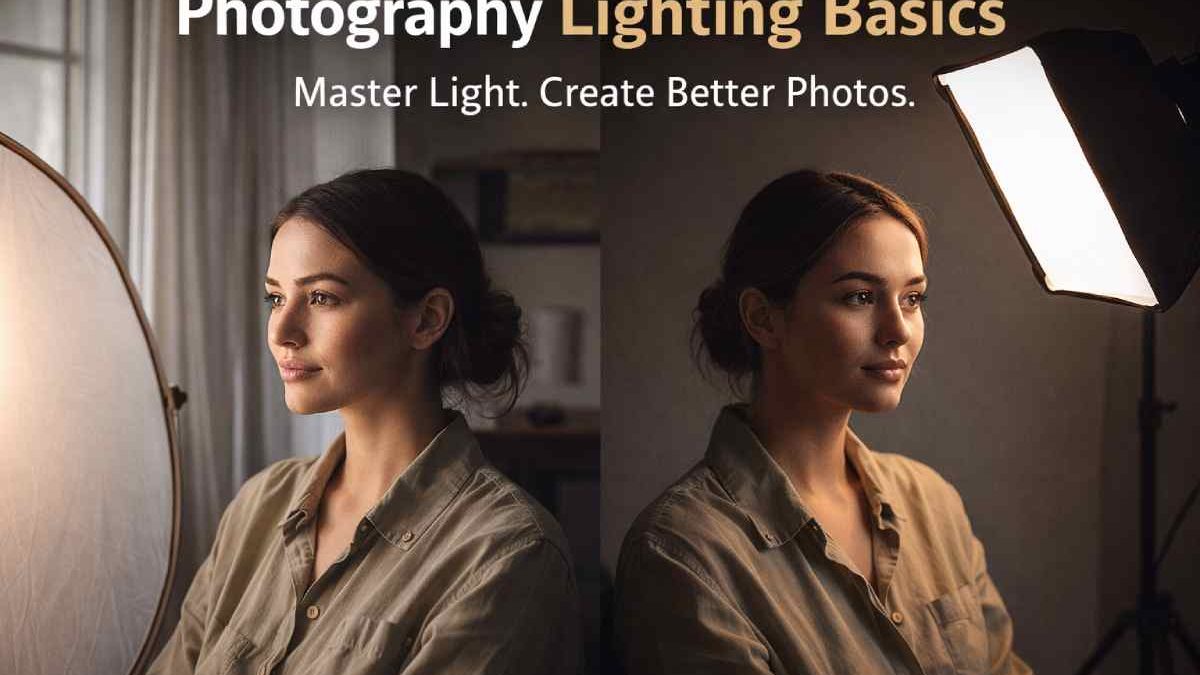
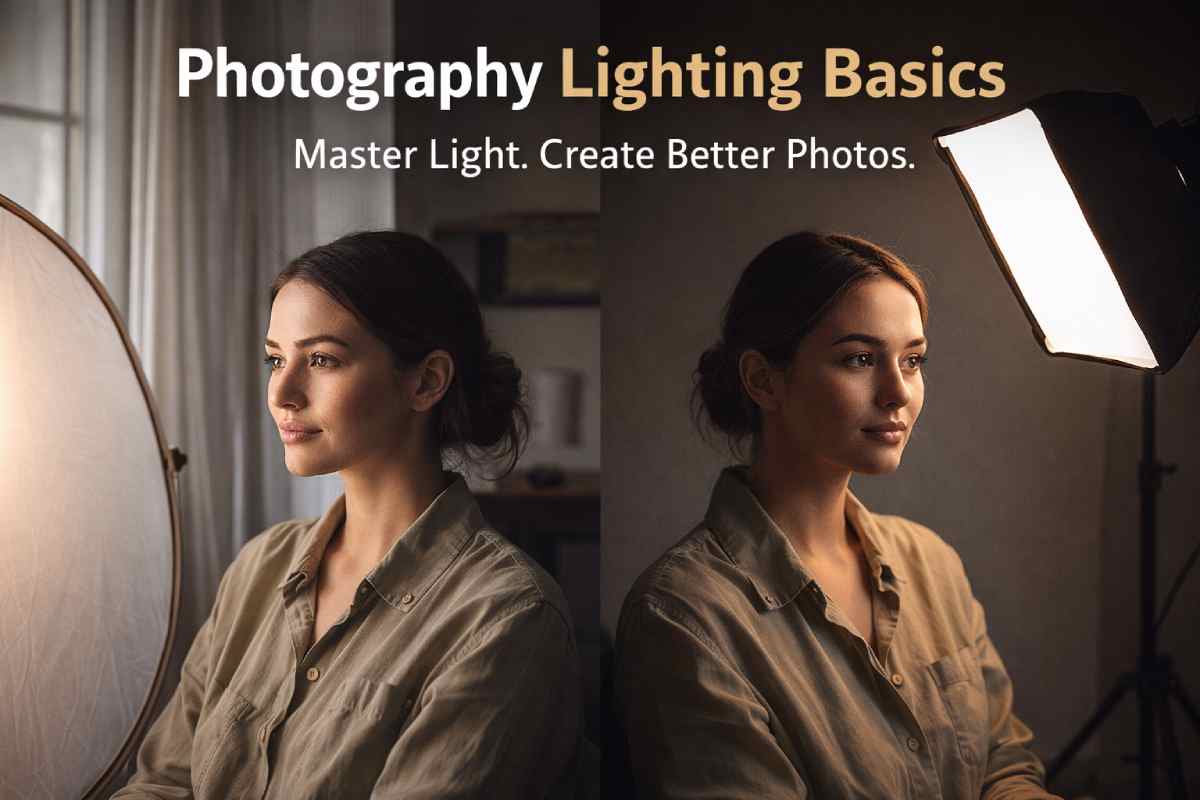
Photography is, at its core, the art of capturing light. Cameras don’t capture subjects they record reflected light. That single truth explains why mastering lighting is the fastest way to improve your photography, regardless of your camera, genre, or experience level.
Whether you’re shooting portraits, products, landscapes, or creative compositions, understanding photography lighting basics gives you full control over mood, dimension, and professional quality.
This comprehensive guide breaks down:
- Natural vs artificial light
- Hard vs soft light
- Essential lighting setups
- Portrait lighting patterns
- Light modifiers
- Direction and color temperature
- Budget and professional gear comparisons
- Practical implementation tips
If you want to move from “average photos” to intentional, powerful imagery, this guide will give you the foundation.
Table of Contents
Why Lighting Is the Foundation of Great Photography
Photography literally means “drawing with light.” A camera sensor does not see subjects the way our eyes do — it records light reflected from them. That means every technical and creative decision in photography ultimately connects back to light. Before lenses, megapixels, or editing software matter, light determines whether an image works or fails.
When photographers truly understand lighting, they stop relying on luck and start creating results intentionally. Let’s break down exactly why lighting is the core foundation of great photography.
1. Exposure: The Base of Every Image
Exposure refers to how bright or dark your image appears. It’s controlled by aperture, shutter speed, and ISO but those settings only respond to one thing: available light.
If lighting is too harsh:
- Highlights blow out.
- Skin tones lose detail.
- Skies turn white instead of blue.
If lighting is too weak:
- Shadows lose information.
- Noise increases (especially at high ISO).
- Images look muddy or underwhelming.
Balanced lighting gives you flexibility. Instead of pushing ISO or slowing shutter speed (which can introduce blur), good light allows optimal camera settings and cleaner results.
In other words, strong lighting makes technical settings easier to manage.
2. Contrast: The Separation Between Light and Shadow
Contrast defines the difference between the brightest and darkest areas in an image. Lighting direction and intensity directly control this.
- Hard side lighting increases contrast.
- Soft, diffused light reduces contrast.
- Backlighting can create silhouettes.
High contrast often feels dramatic and bold. Low contrast feels soft and calm. Neither is inherently better but choosing the right contrast is a creative decision driven by lighting.
Without thoughtful lighting, contrast becomes accidental instead of intentional.
3. Depth and Dimension: Turning 2D Into 3D
A photograph is a flat, two-dimensional representation of a three-dimensional world. Lighting is what restores that missing dimension.
When light hits a subject from an angle:
- Shadows form.
- Highlights create shape.
- Facial features become sculpted.
- Objects gain volume.
Front lighting flattens features because it minimizes shadows. Side lighting adds structure and realism because it creates shadow gradients.
This is why portrait photographers often place the key light at a 45-degree angle it sculpts the face rather than flattening it.
Depth is not created in editing software. It is created with lighting direction.
4. Texture Visibility: Revealing or Hiding Detail
Lighting determines how much texture is visible in an image.
Side lighting emphasizes texture by casting small shadows within surfaces. This works well for:
- Architectural photography
- Food photography
- Landscape details
- Fabric and product shots
Soft frontal lighting minimizes texture by filling shadows. This is preferred for:
- Beauty photography
- Portraits
- Fashion
Understanding this allows you to decide whether to highlight or smooth surface details. Without control over lighting, texture can either overpower an image or disappear entirely.
5. Mood and Emotional Tone
Lighting shapes emotional response more than any other visual element.
Consider these examples:
- Warm sunset light creates nostalgia and warmth.
- Cool blue tones suggest calm or isolation.
- High-key bright lighting feels optimistic and commercial.
- Low-key shadow-heavy lighting feels mysterious or dramatic.
The same subject photographed under different lighting conditions can tell completely different stories.
For example:
- A portrait in soft window light feels intimate.
- The same portrait under harsh overhead light feels tense or clinical.
Lighting is storytelling.
6. Color Accuracy and White Balance
Light has temperature. Measured in Kelvin, different light sources cast different color tones:
- Candlelight appears warm and orange.
- Midday sun appears neutral.
- Overcast skies lean slightly cool.
- Fluorescent lights can create green casts.
If lighting temperature isn’t managed properly:
- Skin tones look unnatural.
- Product colors appear inaccurate.
- Images require heavy correction in post-production.
Professional photographers either control their light source or adjust white balance carefully to maintain consistent, accurate color.
Color consistency is especially critical in commercial, product, and branding photography.
7. Lighting vs Equipment: Why Light Matters More Than Camera Gear
Many beginners assume upgrading their camera will automatically improve their photos. In reality, lighting has a far greater impact on image quality than megapixels or brand name equipment.
Poor lighting on an expensive camera results in:
- Flat, dull images
- Washed-out colors
- Weak shadows
- Lack of separation
Good lighting on a basic camera can produce:
- Strong depth
- Clean exposure
- Professional-looking portraits
- Balanced color
That’s why experienced photographers invest in lighting gear before upgrading camera bodies.
Light creates quality. Cameras record it.
8. Control Creates Consistency
Understanding light gives you repeatable results.
Instead of hoping for perfect natural light, you can:
- Position subjects strategically.
- Add reflectors.
- Diffuse harsh sunlight.
- Adjust artificial light ratios.
- Match color temperatures.
Consistency is what separates hobbyists from professionals. Clients and brands expect predictable outcomes. Mastering lighting ensures you can recreate results regardless of time of day or environment.
9. Lighting as a Creative Tool, Not Just a Technical Requirement
Lighting is not just about solving exposure problems — it’s about artistic direction.
It allows you to:
- Highlight what matters most.
- Hide distractions in shadow.
- Direct the viewer’s eye.
- Establish visual hierarchy.
- Create brand identity through mood.
Every major photography genre — from fashion to product to landscape — relies on lighting as its central creative tool.
Lighting Equipment Price Breakdown
Lighting gear ranges from entry-level to professional systems.
Speedlights
| Level | Price Range |
|---|---|
| Entry | ₹3,000–₹8,000 |
| Mid | ₹8,000–₹20,000 |
| Professional | ₹20,000+ |
Softbox Kits
| Level | Price Range |
|---|---|
| Entry | ₹1,500–₹5,000 |
| Mid | ₹5,000–₹15,000 |
| Professional | ₹15,000+
|
LED Continuous Panels
| Level | Price Range |
|---|---|
| Entry | ₹2,000–₹8,000 |
| Mid | ₹8,000–₹20,000 |
| Professional | ₹20,000+ |
Prices vary depending on wattage, build quality, brand reputation, and feature set.
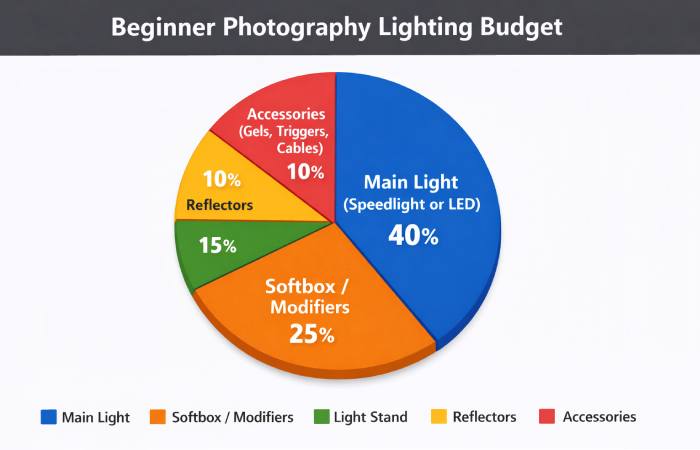
Budget Allocation Pie Chart
Common Lighting Mistakes to Avoid
Lighting can elevate a photo instantly — but small mistakes can just as quickly ruin an otherwise strong composition. Many beginners focus heavily on camera settings and forget that lighting decisions are often the real reason an image looks unprofessional.
Avoiding these common lighting mistakes will dramatically improve the quality, consistency, and impact of your photography.
1. Using Flash Directly on the Subject Without Diffusion
One of the most common beginner mistakes is firing a bare flash directly at the subject.
Why This Is a Problem
Direct, undiffused flash:
- Creates harsh, unflattering shadows behind the subject
- Produces shiny hotspots on skin
- Causes red-eye
- Flattens facial features
- Removes depth and dimension
This happens because the flash becomes a small, intense light source positioned close to the camera axis. The result is hard light with sharp shadow transitions and minimal sculpting.
How to Fix It
- Use a softbox or umbrella.
- Bounce the flash off a wall or ceiling.
- Attach a diffuser cap.
- Move the flash off-camera.
- Increase the size of your light source relative to the subject.
Even a simple white reflector or ceiling bounce can dramatically soften the effect and improve skin tones.
2. Ignoring Shadow Placement
Shadows are not the enemy — uncontrolled shadows are.
Many photographers focus only on where the light hits but forget to observe where shadows fall.
Why Shadow Placement Matters
Shadows:
- Define shape and dimension
- Influence mood
- Direct the viewer’s attention
- Either enhance or distort facial features
Poor shadow placement can:
- Create dark eye sockets
- Emphasize unflattering facial angles
- Distract from the subject
- Cause unwanted background shadows
For example, overhead lighting can create heavy under-eye shadows. Side lighting placed too low can distort facial structure.
How to Improve Shadow Control
- Always observe shadow direction before shooting.
- Adjust light height slightly even a few inches matters.
- Use reflectors to soften harsh shadow edges.
- Test multiple angles before committing.
Professional photographers study shadow behavior as carefully as highlights.
3. Overexposing Highlights
Blown highlights are one of the fastest ways to reduce image quality.
What Are Blown Highlights?
Blown highlights occur when bright areas lose detail entirely and turn pure white. Once highlight detail is lost, it cannot be recovered even in post-processing.
Common causes include:
- Shooting in harsh midday sunlight
- Using flash power that’s too high
- Not checking histogram
- Reflective surfaces (forehead shine, glass, metal)
Why It’s Harmful
- Skin texture disappears.
- Clouds lose definition.
- Product details vanish.
- The image looks unbalanced and amateur.
How to Prevent It
- Check your histogram, not just your LCD preview.
- Slightly underexpose and recover shadows later.
- Lower flash power gradually.
- Use diffusers or scrims in harsh sunlight.
- Position subjects out of direct overhead sun.
Protecting highlights is especially critical in portrait and commercial photography.
Control Creates Consistency
Understanding light gives you repeatable results.
Instead of hoping for perfect natural light, you can:
- Position subjects strategically.
- Add reflectors.
- Diffuse harsh sunlight.
- Adjust artificial light ratios.
- Match color temperatures.
Consistency is what separates hobbyists from professionals. Clients and brands expect predictable outcomes. Mastering lighting ensures you can recreate results regardless of time of day or environment.
Final Thoughts
Photography lighting basics are not about memorizing formulas. They are about understanding how light behaves and learning how to shape it intentionally.
When you control light, you control:
- Emotion
- Professional quality
- Depth
- Texture
- Brand consistency
Start simple. Master one light. Study shadows. Observe natural light daily.